
 This is a common question and the answer can vary dramatically depending on your site and what the specs of your shed are.
In this blog, we look at four different situations and discuss what site works are required for each.
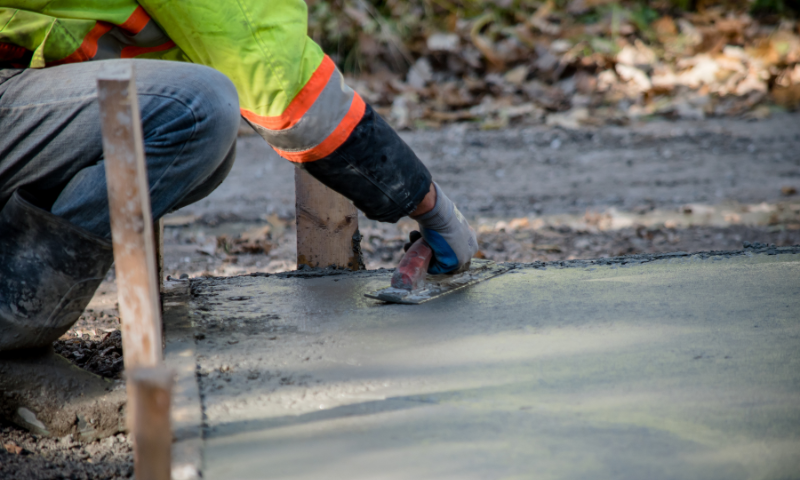
Site prep for a shed with a concrete floor
If you are needing a concrete floor in your shed, you will need to prepare a level, compacted, and concrete-ready build platform. If the ground is good quality and has good load bearing, site preparation is typically very simple.
Just scrape the topsoil away down to the hard, original ground and spread 200-400mm of AP20 (or similar) gravel around. Once the gravel is level, compact the gravel to form a hard base for the concrete to sit on. Some final adjustments may need to be made to the gravel heights to remove any humps or hollows.
We also recommend making the gravel area 700mm wider or more around the shed pad, so it's easy to walk around the shed during construction. If you are using scissor lifts for access, you may want to make this even wider so there is flat ground to drive on safely.
Site prep for a shed without a concrete floor
If your shed does not require a concrete floor, site preparation is easier. You will still need to level the site to make it easier for the builders. However, this does not need to be as exact as you would need if you were doing a concrete floor.
Scrape the topsoil away and spread 200-400mm of gravel around — this will stop the site from becoming too muddy, especially in winter. It does help the builder if the pad is compacted as it provides a more stable work platform for elevated work platforms when the builder is working at height.
Site prep for a shed being installed on uneven/sloping ground
If your site is sloping or on uneven ground, site work can be a little more extensive. You may need to perform a site cut which means you dig into the hillside to create a level area. This will depend entirely on the angle of the slope and the size of your required build platform. Once the ground is cut away, you may need to build retaining walls to stop the cut from caving in.
If you need to perform a site cut, you will need specialist skills and equipment. We would highly recommend speaking to someone who specialises in earthworks as they will also have a good idea of what is required with retaining walls and stormwater drainage.
Once the site cut has been completed, you will need to spread gravel as outlined in the points above.
Site prep for a shed being installed on unfavourable ground conditions
This is a big one and it can add significant cost to the build, as extensive foundations and specialist skills are likely to be required. If your site is known to be sandy, peaty, or very soft with swamp-like conditions, you will need a geo-tech report. These typically cost about $1,500.00+GST however, the council won’t sign off the consent without one if the ground conditions are questionable.
An engineer or surveyor will need to come to the site and dig test holes around the build platform. These holes can be several meters deep to reveal the layers of soil and determine exactly what the ground consists of. They will also form a compaction test which will reveal exactly how hard the ground is and how much weight it will support. They will then determine what the best course of action is with the site works and what type of foundations are required to meet council regulations.
Installing drainage and power
When it comes to preparing your site, it's often a good time to make provision for your drainage and power requirements. Drainage often consists of digging a soak pit, and channelling it to a natural water course or existing stormwater infrastructure which will be specified on your signed shed plans.
If you need to get power to your shed, now could be the time to run it underground while you are doing site works. This will save you from potentially having to dig up your site a second time. Once again, have a chat with your contractor to help determine what is best for your particular site.
In most cases, the site work for a standard pole shed is quite simple. In some cases, more specialist skills and equipment are required to meet council regulations.
If you are unsure of the ground conditions at your site, it would be advisable to speak with your local council first. The councils often have a reasonable idea of what the ground conditions in your area are like based on previous builds on neighbouring sites. Otherwise, get a geo-tech report done on your site which will tell you everything you need to know and may save you the unpleasant surprise of a large unforeseen bill due to extensive foundations.
Whatever the conditions are at your site, feel free to contact the team for advice — the earlier the better. For example, if you do have a slight slope on the ground, it means we can supply longer poles as required, or make special notes on the plans where applicable.
Please note this advice is general in nature, and we highly recommend checking with the council, shed supplier, or approved earthworks contractor for confirmation before proceeding with site works.


.png?width=800&name=Concrete%20floors%20blog%20(1).png)